Renovating a Mid-Century Landmark Part 3: Construction
In two of our previous blogs, we have been diving deeply into the entire design/build process as illustrated through a mid-century renovation project we’ve been working on. In Part 1 we discussed the purchasing and brainstorming phase. In Part 2 we talked through design and planning. This week we’ll be discussing the (literal) nuts and bolts that go into making those plans and designs and dreams a reality. All too often in renovation stories you see the ho-hum before and the beautiful after, but not much of the messy in between. Today we’re walking through all the fun, messy, challenging parts of the build out phase that our whole team loves.
This mid-century gem was bought by Sarah and Ron Villacarillo, who brought us in before they even put an offer on the house, so we were able to truly be a part of the process from beginning to end. But working with older homes always presents unique challenges. Opening up the walls of a 60 year old house also reveals some hidden gems and pieces of history that were just too good not to share.
First things first, though. We knew based on the age of the home that the tiles were likely asbestos and testing proved that to be true, so extra care was taken to safely remove and dispose of those prior to any other work being done in the house. Other necessary updates were tackled during the renovation process as well such as a roof replacement, a new boiler and added insulation. Things that are critical to the comfort and longevity of the home, but can be hard to show in a tidy “after” photo.

The basement with its original asbestos floor tile, acoustic ceiling tile, and moisture damaged paneling buckling off the walls.
All of those necessary updates illustrate our holistic approach to renovations. We consider it necessary to open up the walls of an older home in order to ensure that it is solid, efficient and good for decades to come. In the walls of this home, we uncovered a little bit of building history: this mess is a 3-layer, accordian-folded aluminum foil insulation product with a kraft paper core. It was the original insulation in the home, which we found in some areas of the living and dining room during demolition, and it was a popular option for residential insulation from the late 1940’s through 60’s.

Once the “vintage” insulation was removed, new spray foam insulation was installed to keep this living space cozy and comfortable for many decades to come.

Peeling off the walls of the wood paneled basement, we found this label (left) and were able to track down an advertisement from that time period featuring the same product (right). The paneling was beyond repair after years of moisture damage and many coats of paint and had to be disposed of, but it was a fun find and interesting to think about how much design preferences have changed in the last several decades!

This label wasn’t the only gem we found behind that paneling. We also uncovered kids’ graffiti on the block walls dated 1967 - a decade after the house was built when the basement must have received its first renovation. The phrases “Uncle Sam wants you”, and “up with hemlines” are like a little time capsule from Vietnam War era life in the house.

One of the most interesting challenges that we knew we needed to tackle going into the house were the floors in the main living, dining, and kitchen area. The original floors are a concrete slab poured on grade which encapsulates the rooms’ heat source - a hydronic radiant heat system embedded in the concrete that was still in great working order. Because the renovation included removing the walls that separated the kitchen from the living space, and adding a large island with plumbing and electrical components, we had to find ways to run plumbing and electrical to our new island while also keeping the original heating system intact and functional. This meant we first had to locate the original radiant heat pipes in the floor. And this meant we got to play around with a pretty fun piece of technology.
With the help of local thermal imaging consultants and their specialized equipment, we located every pipe in the kitchen slab by cranking up the heat. The only area of the floor without radiant heat lines gave us 16” to cut out a portion of the floor and add new power and plumbing connections for the island before patching the concrete.

Thermal imaging in process - we marked every pipe in the kitchen floor.

Here the thermal imaging photos show locations of the radiant heat lines in the slab (running right under the kitchen walls) - and the one spot in the kitchen floor where we could cut out the slab to make our new connections.

The new (and carefully located!) home of island plumbing and power connections.

Mission accomplished - we demolished walls, added new power and plumbing in the floor, repaired the slab - and made way for a big, beautiful new kitchen island that will be the center of activity in this completed space.
Demolishing those walls that bound in the kitchen was no small undertaking either. This was a key requirement of the renovation by the homeowners and we all agreed. Demolition revealed some unusual framing conditions in the ceiling which made for a unique load-bearing challenge as we were also trying to avoid new bearing points on the concrete slab and the pipes we just discussed. But with the help of our structural engineer, we developed and revised the beam design, eliminated all kitchen walls and columns and transformed the space by fully opening the kitchen, living and dining room to each other.
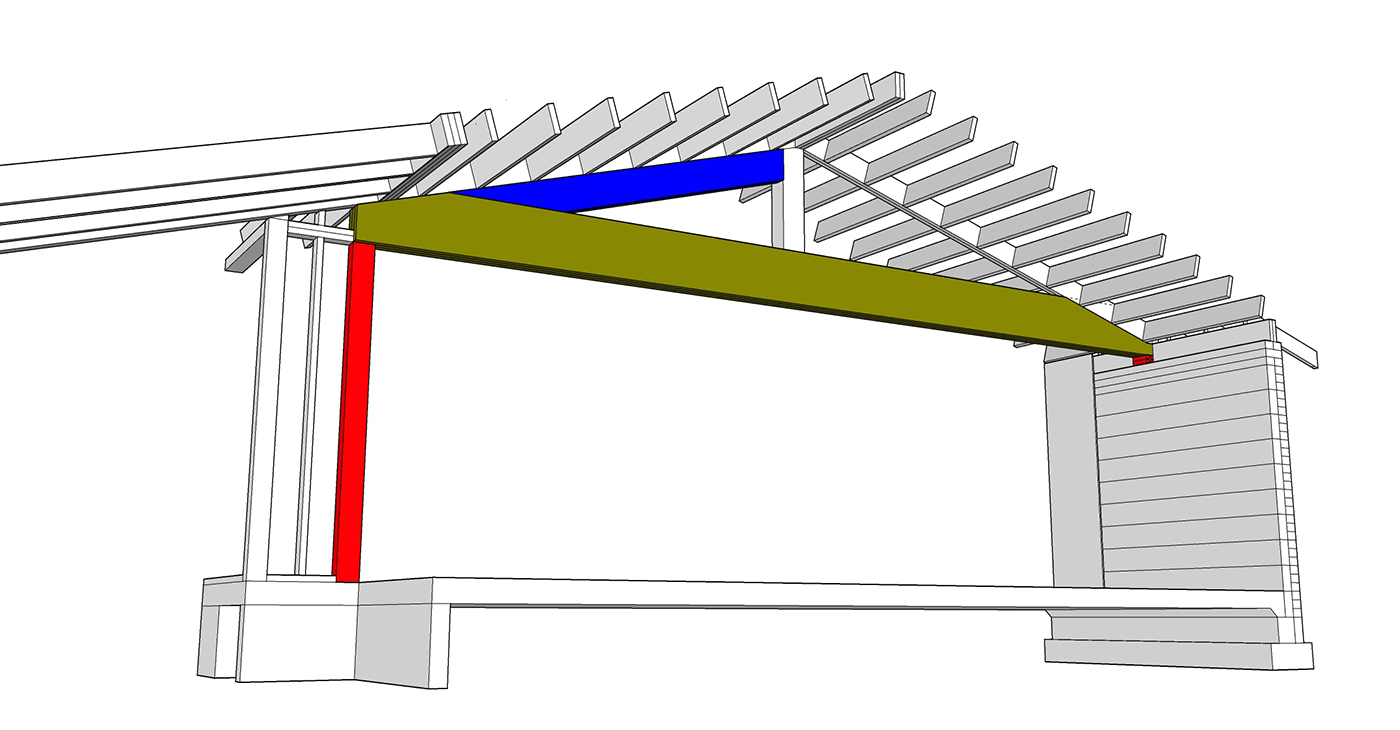
First things first - we model the new beam.

The kitchen is ready to be released from its little box.

Walls down and beams up - what a difference it makes in this living area!
We truly believe that construction should be the most exciting part of the process for us and our clients as we all get to watch the pieces fall into place.
“We’ve found that the more our clients become engaged with the construction process and the many steps, conditions, and decisions along the way, the more they’re able to appreciate and enjoy their home when our work is done.
”
Every client and every project is different. In this home, the client was not living in the home and had never lived there before. In other cases clients have been out of town during construction, some are living in their homes during the project, or they may be living somewhere else locally. Sometimes the home is new to them, sometimes they’ve been living in it for decades. But at the core of every project is communication - between us and our client and between our team members. Regular meetings, shared websites, showroom visits, progress photos, shared calendars, phone calls, texts and emails - all are tools in our communication toolbox that we use regularly. Because we want clients to be engaged, involved and excited at every step of the design/build process.
Our final installment of this blog series where we show off the final touches from this exciting project!